Create your own low budget network based Intrusion Detection System
Create your own low budget network based Intrusion Detection System
1553 words 7 Minutes, 3 Seconds
2025-03-09 00:00 +0000
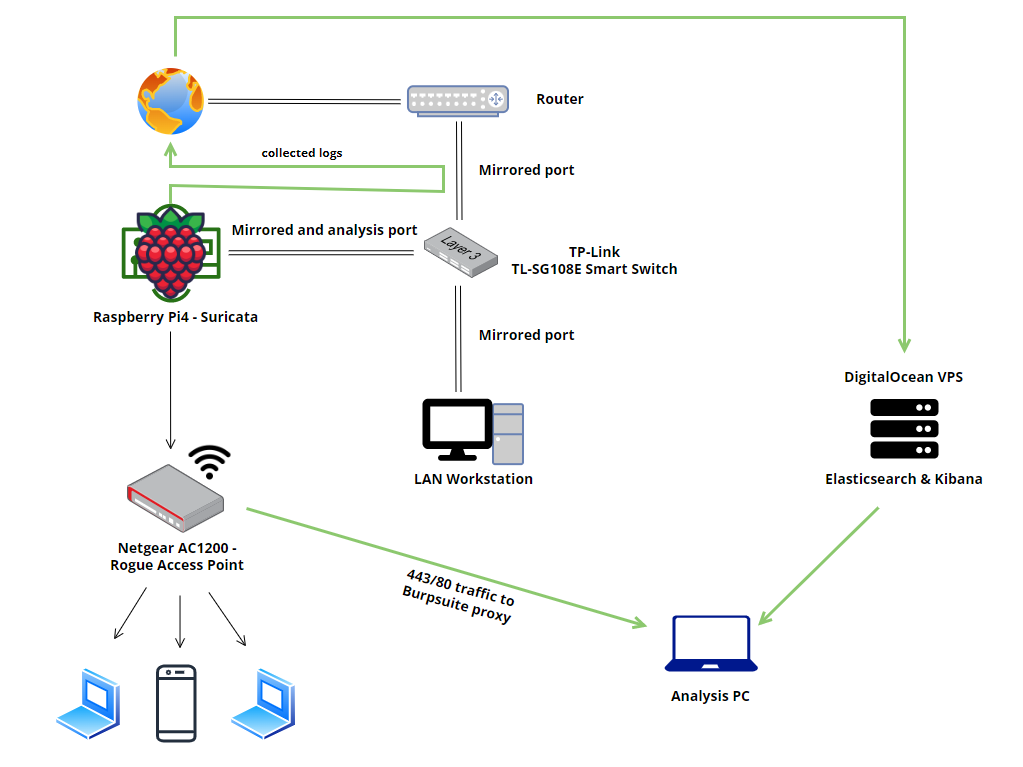
Table of contents
- Why is IDS necessary?
- Hardware requirements
- Software requirements
- Switch setup
- Install Elasticsearch, Kibana and Wazuh
- Configure the Elasticsearch
- Configure Kibana
- Configure Filebeat
- Set Suricata, Filebeat, and Rogue Access Point on the Raspberry Pi 4
- Configure Suricata
- Configure Filebeat
- Configure the Rogue Access Point
- Check the logs
Why is IDS necessary?
The IDS analyses traffic flows to the protected resource in order to detect and prevent exploits or other vulnerability issues, IDS can offer protection from external users and internal attackers, where traffic doesn’t go past the firewall at all.
In this article, I will explain how to build your own home network-based Intrusion Detection System (IDS) using a low budget.
NOTE: This network-based could be easily transformed into a strong SIEM by installing Wazuh-Agent on all devices that are part of the infrastructure (physical access), as the pic
Hardware requirements
- Any router with multiple ports
- TP-Link TL-SG108E Smart Switch
- Raspberry Pi4 8GB
- Netgear AC1200 network adapter
- 1 x DigitalOcean VPS, minimum requirements: 4 GB Memory / 50 GB Disk / Ubuntu 22.10 x64
Software requirements
- Elasticsearch
- Kibana
- Filebeat
- Filebeat modules
- Suricata
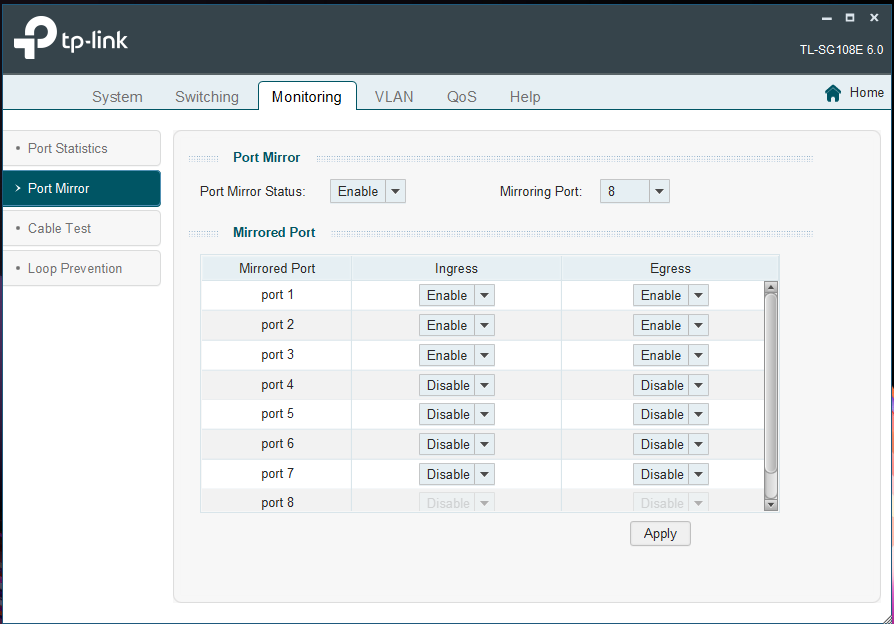
Switch Setup
First of all, we need to set the ports that we want to mirror, in this case, ports 1, 2, and 3 will be mirrored to port 8. Let’s assume that you have already the Easy Smart Configuration Utility installed and configured.
- Login to your Switch Windows Application / Web interface
- Go to “Monitoring”
- Choose the “Port Mirror” option on the left menu
Ok, all you have to do is to change the Port Mirror status to enable and Mirroring Port to port 8, next enable the “Ingress” and “Egress” for ports 1, 2, and 3, after that just click on “Apply”.
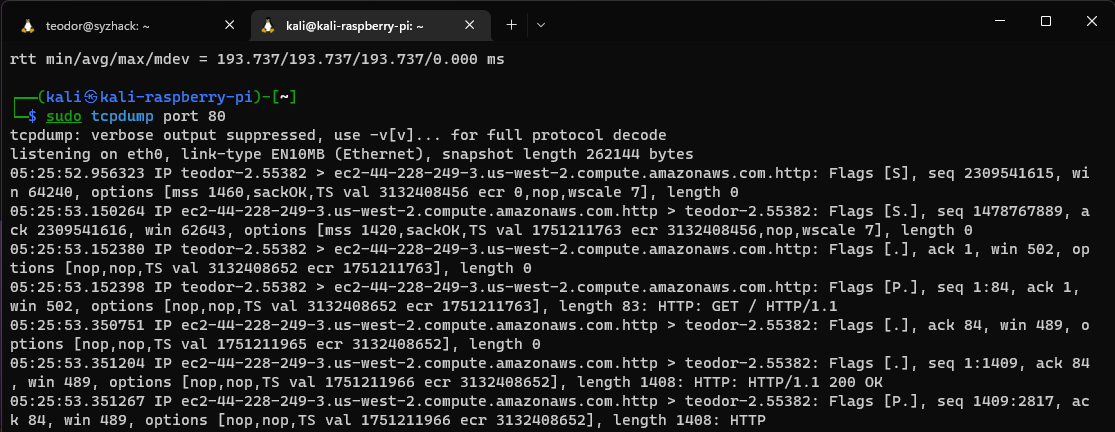
To check if the traffic is mirrored, login to your Raspberry and capture the port 80 traffic while you do a browser/curl request to http://testphp.vulnweb.com/ using your device connected to any of the following ports 1, 2, or 3.

It looks good:
Install Elasticsearch, Kibana and Wazuh
For this project, I used a Ubuntu VPS from DigitalOcean, as you probably know those components require many resources, if this system is used on a large scale is recommended to use a distributed system. In my case I use “All-in-one deployment”, so I highly recommend a server with a minimum of 4 GB Memory / 50 GB Disk / Ubuntu 22.10 x64.
- Login and update your server
apt-get update
- Install the requirements
apt-get install curl apt-transport-https zip unzip lsb-release libcap2-bin -y
- Trust the GPG key and add the Elasticsearch to your source list
curl -s https://artifacts.elastic.co/GPG-KEY-elasticsearch --max-time 300 | apt-key add -
echo 'deb https://artifacts.elastic.co/packages/7.x/apt stable main' | eval "tee /etc/apt/sources.list.d/elastic-7.x.list"
- Trust the GPG key, add the Wazuh to your source list and update the system
curl -s https://packages.wazuh.com/key/GPG-KEY-WAZUH --max-time 300 | apt-key add -
echo "deb https://packages.wazuh.com/4.x/apt/ stable main" | tee -a /etc/apt/sources.list.d/wazuh.list
apt-get update
- Install components
apt-get install elasticsearch -y
apt-get install kibana=7.11.2 -y
apt-get install wazuh-manager -y
apt-get install filebeat -y
Configure the Elasticsearch
Create the file below to /etc/elasticsearch/elasticsearch.yml
network.host: 0.0.0.0
node.name: elasticsearch
cluster.initial_master_nodes: elasticsearch

# Transport layer
xpack.security.transport.ssl.enabled: true
xpack.security.transport.ssl.verification_mode: certificate
xpack.security.transport.ssl.key: /etc/elasticsearch/certs/elasticsearch.key
xpack.security.transport.ssl.certificate: /etc/elasticsearch/certs/elasticsearch.crt
xpack.security.transport.ssl.certificate_authorities: /etc/elasticsearch/certs/ca/ca.crt

# HTTP layer
xpack.security.http.ssl.enabled: true
xpack.security.http.ssl.verification_mode: certificate
xpack.security.http.ssl.key: /etc/elasticsearch/certs/elasticsearch.key
xpack.security.http.ssl.certificate: /etc/elasticsearch/certs/elasticsearch.crt
xpack.security.http.ssl.certificate_authorities: /etc/elasticsearch/certs/ca/ca.crt

# Elasticsearch authentication
xpack.security.enabled: true

path.data: /var/lib/elasticsearch
path.logs: /var/log/elasticsearch
Note: You can use the same configuration.
- Create the file below to
/usr/share/elasticsearch/instances.yml
instances:
- name: "elasticsearch"
  ip:
  - "127.0.0.1"
Note: Don’t forget to change your public IP.
- Generate the certificates using the bash script below:
#!/bin/bash

/usr/share/elasticsearch/bin/elasticsearch-certutil cert ca --pem --in instances.yml --keep-ca-key --out ~/certs.zip
unzip ~/certs.zip -d ~/certs
mkdir /etc/elasticsearch/certs/ca -p
cp -R ~/certs/ca/ ~/certs/elasticsearch/* /etc/elasticsearch/certs/
chown -R elasticsearch: /etc/elasticsearch/certs
chmod -R 500 /etc/elasticsearch/certs
chmod 400 /etc/elasticsearch/certs/ca/ca.* /etc/elasticsearch/certs/elasticsearch.*
- Start the Elasticsearch
systemctl start elasticsearch
- Generate the passwords
/usr/share/elasticsearch/bin/elasticsearch-setup-passwords auto -b
You will receive an output like this:
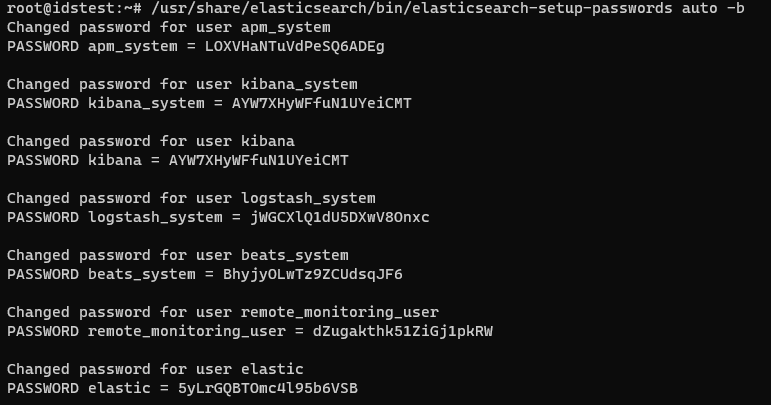
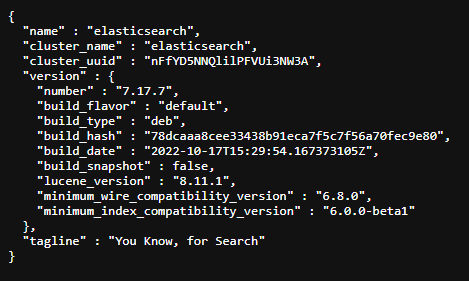
Check if it works by accessing https://<your-public-ip>:9200 with the user: elastic and your generated password.
Configure Kibana
- Create the file below to
/etc/kibana/kibana.yml
server.host: 0.0.0.0
server.port: 443
elasticsearch.hosts: https://localhost:9200
elasticsearch.password: <elasticsearch_password>

# Elasticsearch from/to Kibana

elasticsearch.ssl.certificateAuthorities: /etc/kibana/certs/ca/ca.crt
elasticsearch.ssl.certificate: /etc/kibana/certs/kibana.crt
elasticsearch.ssl.key: /etc/kibana/certs/kibana.key

# Browser from/to Kibana
server.ssl.enabled: true
server.ssl.certificate: /etc/kibana/certs/kibana.crt
server.ssl.key: /etc/kibana/certs/kibana.key

# Elasticsearch authentication
xpack.security.enabled: true
elasticsearch.username: elastic
uiSettings.overrides.defaultRoute: "/app/wazuh"
elasticsearch.ssl.verificationMode: certificate
Note: Don’t forget to add your generated password.
- Configure kibana certs and install the Wazuh plugin
#!/bin/bash

mkdir /usr/share/kibana/data
chown -R kibana:kibana /usr/share/kibana/
cd /usr/share/kibana
sudo -u kibana /usr/share/kibana/bin/kibana-plugin install https://packages.wazuh.com/4.x/ui/kibana/wazuh_kibana-4.1.5_7.11.2-1.zip
mkdir /etc/kibana/certs/ca -p
cp -R /etc/elasticsearch/certs/ca/ /etc/kibana/certs/
cp /etc/elasticsearch/certs/elasticsearch.key /etc/kibana/certs/kibana.key
cp /etc/elasticsearch/certs/elasticsearch.crt /etc/kibana/certs/kibana.crt
chown -R kibana:kibana /etc/kibana/
chmod -R 500 /etc/kibana/certs
chmod 440 /etc/kibana/certs/ca/ca.* /etc/kibana/certs/kibana.*
setcap 'cap_net_bind_service=+ep' /usr/share/kibana/node/bin/node
Start Wazuh-manager
systemctl start wazuh-manager
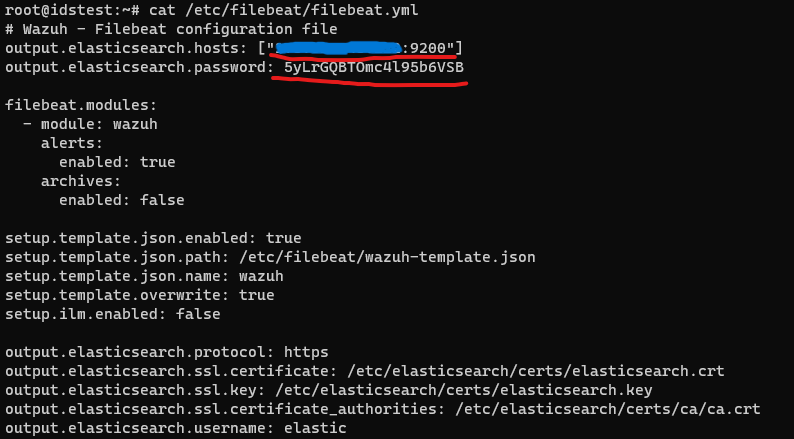
Configure the Filebeat
- Create the following file to
/etc/filebeat/filebeat.yml
# Wazuh - Filebeat configuration file
output.elasticsearch.hosts: ["127.0.0.1:9200"]
output.elasticsearch.password: <elasticsearch_password>

filebeat.modules:
  - module: wazuh
    alerts:
      enabled: true
    archives:
      enabled: false

setup.template.json.enabled: true
setup.template.json.path: /etc/filebeat/wazuh-template.json
setup.template.json.name: wazuh
setup.template.overwrite: true
setup.ilm.enabled: false

output.elasticsearch.protocol: https
output.elasticsearch.ssl.certificate: /etc/elasticsearch/certs/elasticsearch.crt
output.elasticsearch.ssl.key: /etc/elasticsearch/certs/elasticsearch.key
output.elasticsearch.ssl.certificate_authorities: /etc/elasticsearch/certs/ca/ca.crt
output.elasticsearch.username: elastic
Don’t forget to edit the following parameters output.elasticsearch.hosts and output.elasticsearch.password.
- Download wazuh-filebeat module and copy the certificates
#!/bin/bash

curl -so /etc/filebeat/wazuh-template.json https://raw.githubusercontent.com/wazuh/wazuh/4.1/extensions/elasticsearch/7.x/wazuh-template.json --max-time 300
chmod go+r /etc/filebeat/wazuh-template.json
curl -s https://packages.wazuh.com/4.x/filebeat/wazuh-filebeat-0.1.tar.gz --max-time 300 | tar -xvz -C /usr/share/filebeat/module
mkdir /etc/filebeat/certs
cp -r /etc/elasticsearch/certs/ca/ /etc/filebeat/certs/
cp /etc/elasticsearch/certs/elasticsearch.crt /etc/filebeat/certs/filebeat.crt
cp /etc/elasticsearch/certs/elasticsearch.key /etc/filebeat/certs/filebeat.key
- Start the Filebeat
systemctl start filebeat
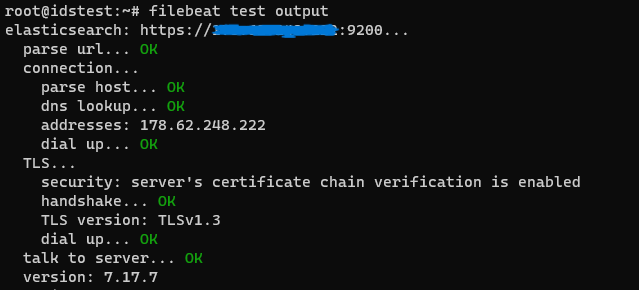
- Test the config
filebeat test output
Ok, it looks good
Set Suricata, Filebeat and Rogue Access Point on the Raspberry Pi 4
In order to install Filebeat, the source below should be added.
curl -s https://packages.wazuh.com/key/GPG-KEY-WAZUH --max-time 300 | apt-key add -
echo "deb https://packages.wazuh.com/4.x/apt/ stable main" | tee -a /etc/apt/sources.list.d/wazuh.list
apt-get update
apt install filebeat
apt install suricata
Configure Suricata
- Make sure that the following file
/etc/systemd/system/suricata.servicelooks like:
[Unit]
Description=Suricata Intrusion Detection Service
After=network.target syslog.target
[Service]
ExecStart=/usr/bin/suricata -c /etc/suricata/suricata.yaml -i eth0 -S /var/lib/suricata/rules/suricata.rules
ExecReload=/bin/kill -HUP $MAINPID
ExecStop=/bin/kill $MAINPID
[Install]
WantedBy=multi-user.target
- Start the Suricata
sudo systemctl start suricata
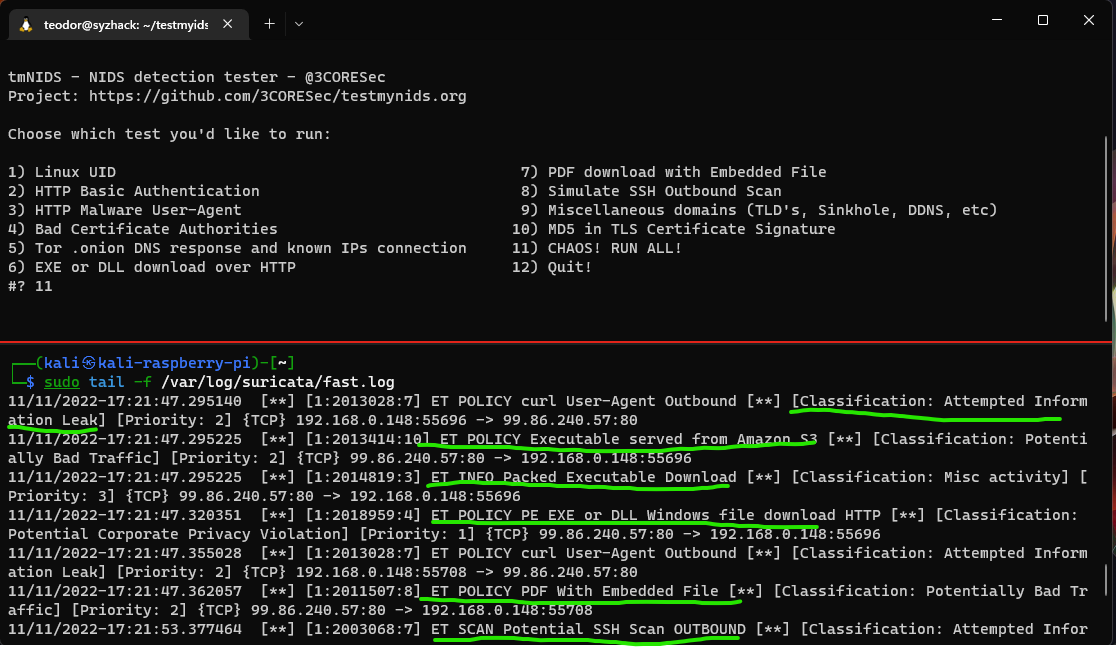
To test your IDS, run the following script on any device that the traffic is mirrored.
- On your Raspberry use the command below to see logs:
sudo tail -f /var/log/suricata/fast.log
Configure Filebeat
- Create the following file to
/etc/filebeat/filebeat.yml
# Wazuh - Filebeat configuration file
output.elasticsearch.hosts: ["206.189.6.131:9200"]
output.elasticsearch.username: elastic
output.elasticsearch.password: wB1t1Fhp7snQgsg0TaAY

filebeat.modules:
  - module: wazuh
    alerts:
      enabled: true
    archives:
      enabled: false

filebeat.config.modules:
  path : /etc/filebeat/modules.d/*.yml

setup.template.json.enabled: true
setup.template.json.path: /etc/filebeat/wazuh-template.json
setup.template.json.name: wazuh
setup.template.overwrite: true
setup.ilm.enabled: false

output.elasticsearch.ssl.verification_mode: none
output.elasticsearch.protocol: https
output.elasticsearch.ssl.certificate: /home/<any-location>/elastic-certs/certs/elasticsearch.crt
output.elasticsearch.ssl.key: /home/<any-location>/elastic-certs/certs/elasticsearch.key
output.elasticsearch.ssl.certificate_authorities: /home/<any-location>/elastic-certs/certs/ca/ca.crt
output.elasticsearch.username: elastic
- Copy the certificates from the Manager server to your Raspberry
scp -r root@<digital-server>:/etc/elasticsearch/certs/ /home/<any-location>/
-
Edit the parameters
output.elasticsearch.ssl.certificate,output.elasticsearch.ssl.keyandoutput.elasticsearch.ssl.certificate_authoritiesaccording to your certificate locations. -
Enable the module for Suricata
sudo filebeat modules enable suricata
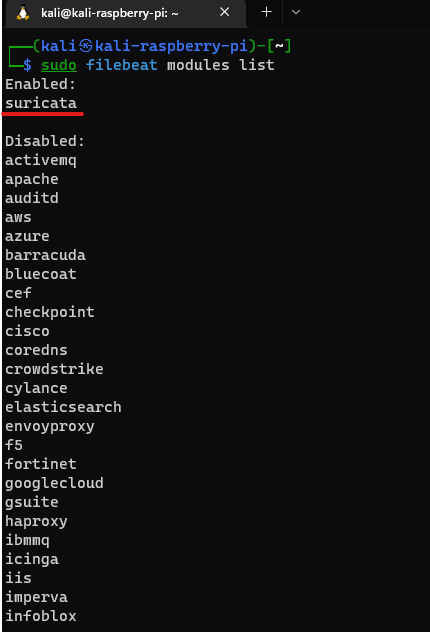
- Let’s check the Filebeat modules
sudo filebeat modules list
- Configure the Suricata module (
/etc/filebeat/modules.d/suricata.yml) as the code below:
# Module: suricata
# Docs: https://www.elastic.co/guide/en/beats/filebeat/7.9/filebeat-module-suricata.html

- module: suricata
  # All logs
  eve:
    enabled: true

    # Set custom paths for the log files. If left empty,
    # Filebeat will choose the paths depending on your OS.
    var.paths: ["/var/log/suricata/eve.json"]
- Start filebeat
sudo systemctl start filebeat
- Test the filebeat output
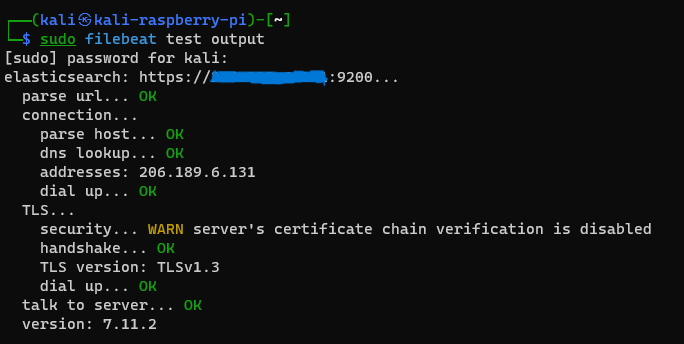
NOTE:
As you probably noticed, the Filebeat configuration file between the Elasticsearch & Kibana (DigitalOcean) server and Raspberry differ, due to the architecture on the Raspberry is used another Filebeat version.
I want to mention that the certificates are usually generated only for one IP, which is why the following option output.elasticsearch.ssl.verification_mode: none is used.
Configure the Rogue Access Point
Q: Ok, maybe you ask why use I a Rogue Access Point instead of a second Wifi router?
A: Using the following adapter AC1200 to create a router the entire traffic could be manipulated, which isn’t possible by using a conventional router.
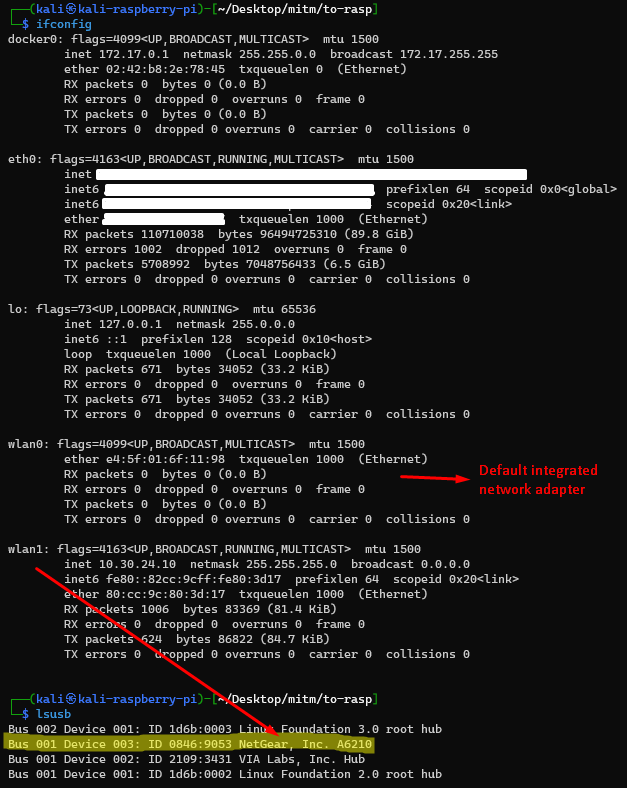
Note: To know what my system looks like, see the pic below.
- Install the requirements:
sudo apt install iptables hostapd dnsmasq
- Create your config file
/etc/hostapd/hostapd.conf
interface=wlan1
ssid=Syzhack
channel=4
hw_mode=g
wpa=3
wpa_key_mgmt=WPA-PSK
wpa_pairwise=TKIP CCMP
wpa_passphrase=Yours4f3pass
auth_algs=3
ap_max_inactivity=99999
ieee80211n=1
wmm_enabled=1
- Adapt the script below with your configuration details, the
wlan1IP range could be also modified.
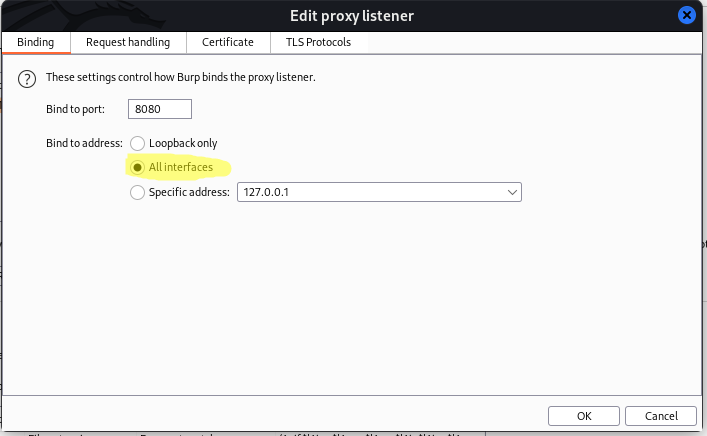
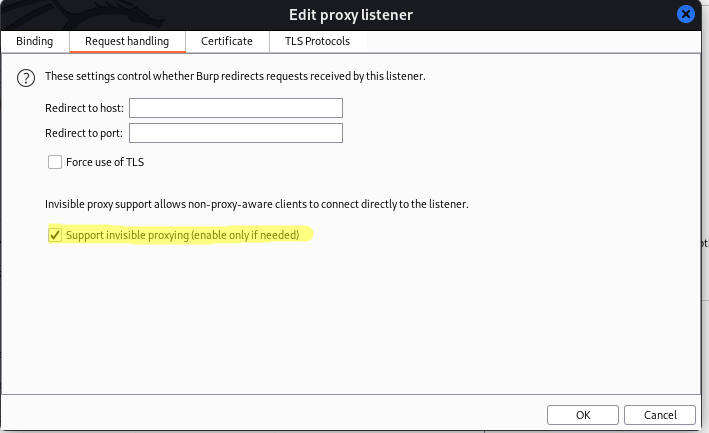
Note: You could run it in the background using a screen session or just create a systemd file. Don’t forget to set the Burpsuite to listen for all interfaces and enable the “invisible proxying” option.
#!/bin/bash

airmon-ng check kill

ip link set dev wlan1 up
ip a a <your-range>/24 dev wlan1
iptables -F -t nat
iptables -X -t nat
iptables -F
iptables -X
iptables -P FORWARD ACCEPT
iptables -t nat -A POSTROUTING -s <your-range>/24 -o eth0 -j MASQUERADE
echo 1 > /proc/sys/net/ipv4/ip_forward

sysctl -w net.ipv4.ip_forward=1
sysctl -w net.ipv4.conf.all.send_redirects=0

iptables -t nat -A PREROUTING -i wlan1 -p tcp --dport 80 -j DNAT --to-destination <your-burp-porxy-ip>:8080
iptables -t nat -A PREROUTING -i wlan1 -p tcp --dport 443 -j DNAT --to-destination <your-burp-porxy-ip>:8080

sleep 3
hostapd -T -B /etc/hostapd/hostapd.conf -f /var/log/hostapd.log
sleep 3
dnsmasq -d -i wlan1
- Run the script:
sudo bash mitm.sh
- Check the Burpsuite results
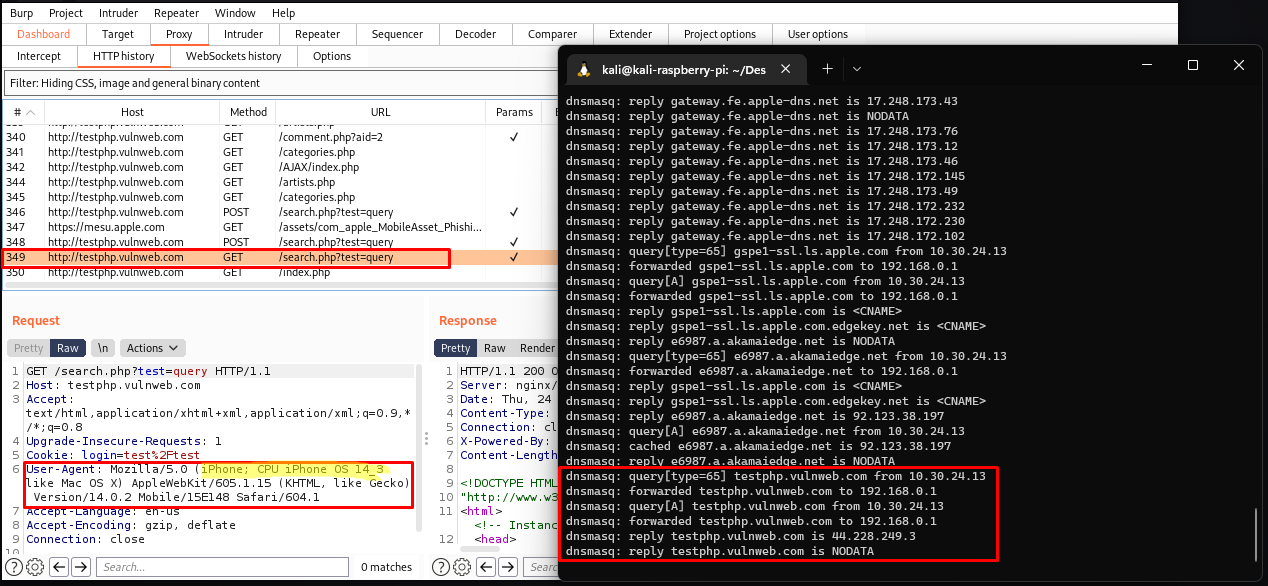
Check the logs
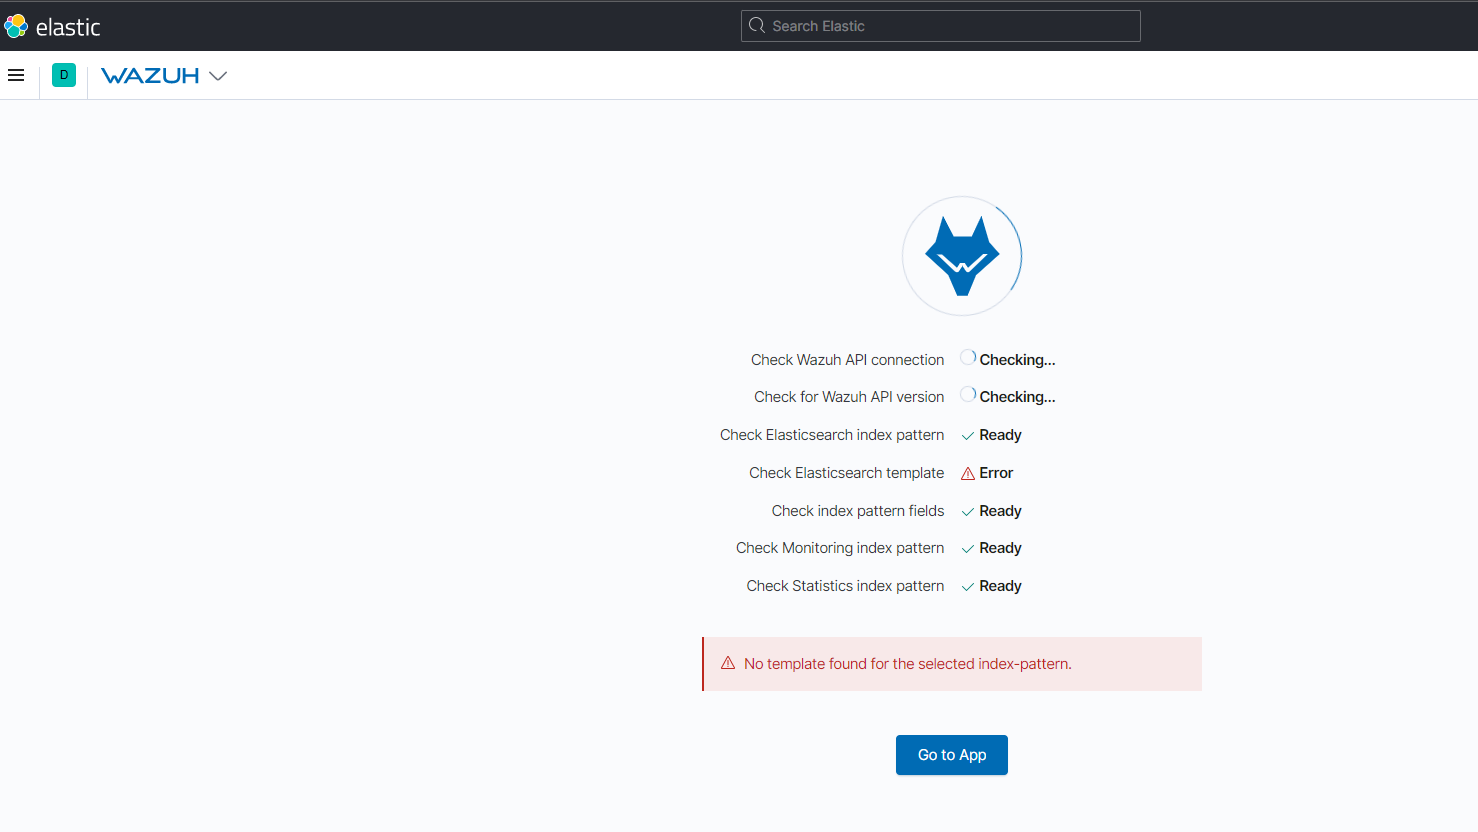
- Go to your Kibana Dashboard using your IP on set port (443 -
https://<ip>) and wait for the Wazuh plugin to be automatically configured, if an error occurs, please wait.
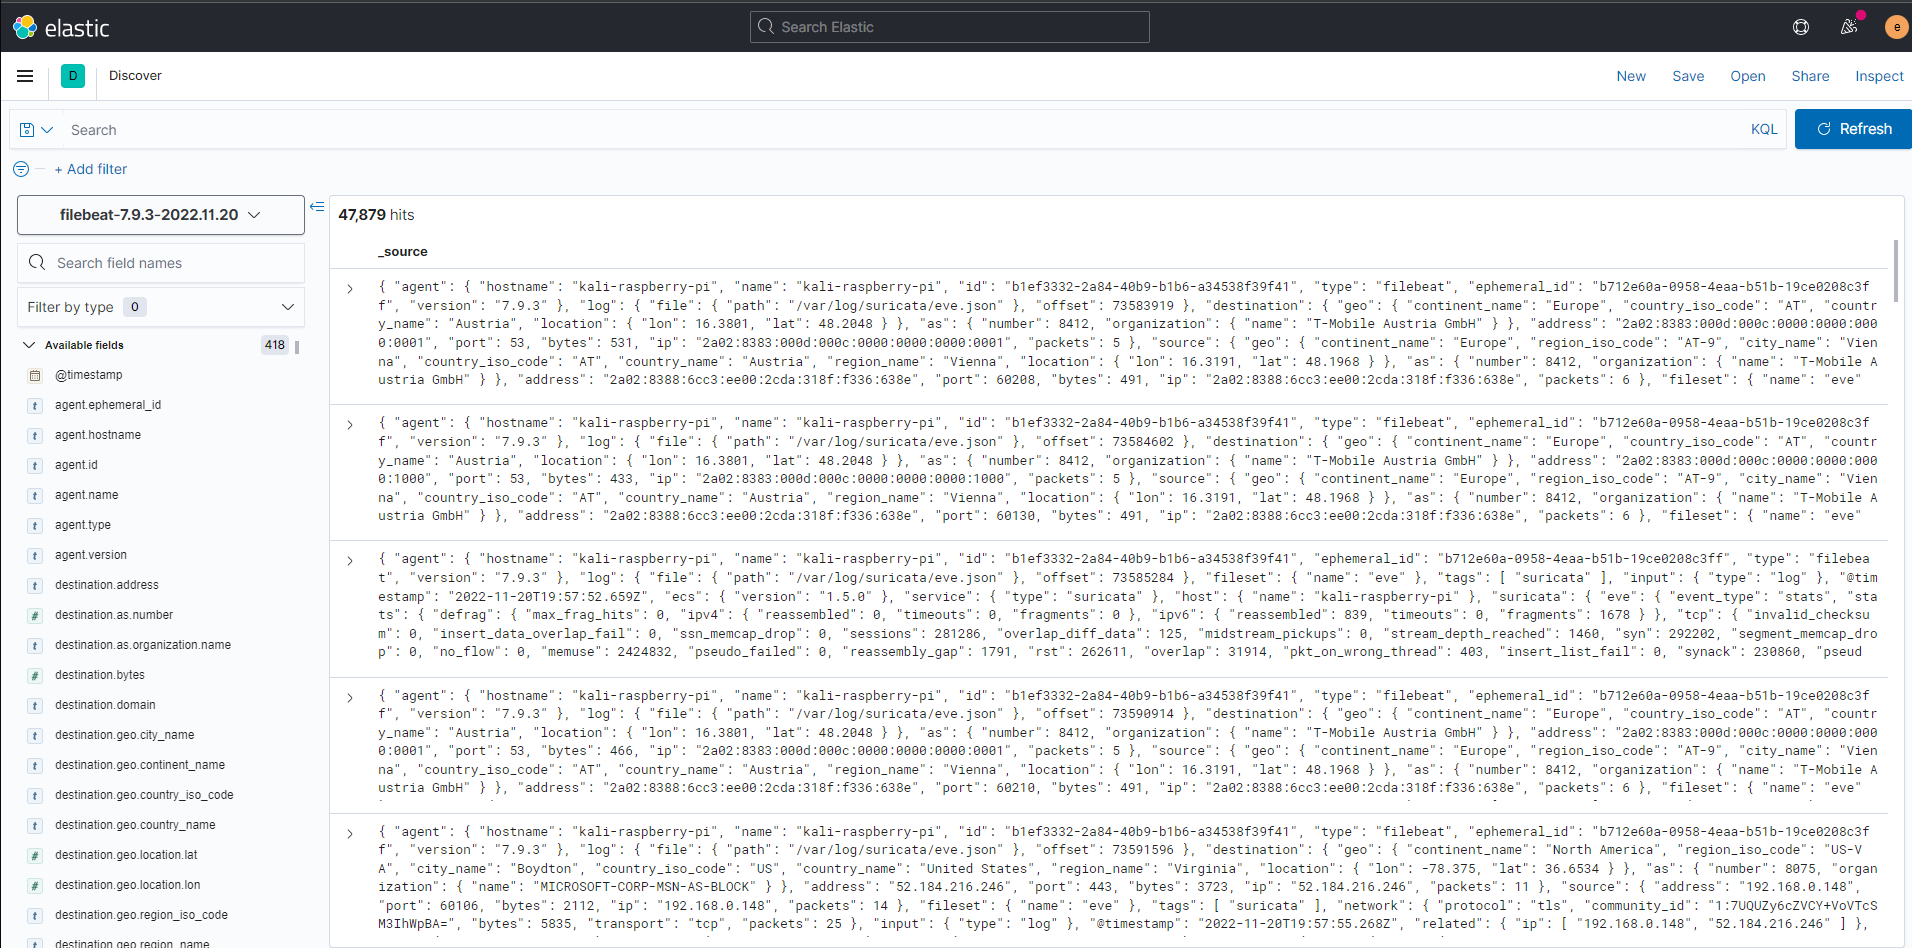
- The Wazuh logs should be displayed as follow:

- Suricata logs:
Security shouldn't be a luxury. By leveraging readily available resources, you can significantly enhance your network's defenses. I hope this article has empowered you to take control of your security posture. If you have any questions or suggestions, please don't hesitate to leave a comment. Let's work together to make cybersecurity accessible to everyone.